Sudoku grid parser
In this article I’ll share details about my Sudoku grid parser and how it came to be.
There are no code blocks in this one, but you can check out the full code on my gitlab.
As a preview, here’s a sample of pictures/screenshots that my program is able to parse.
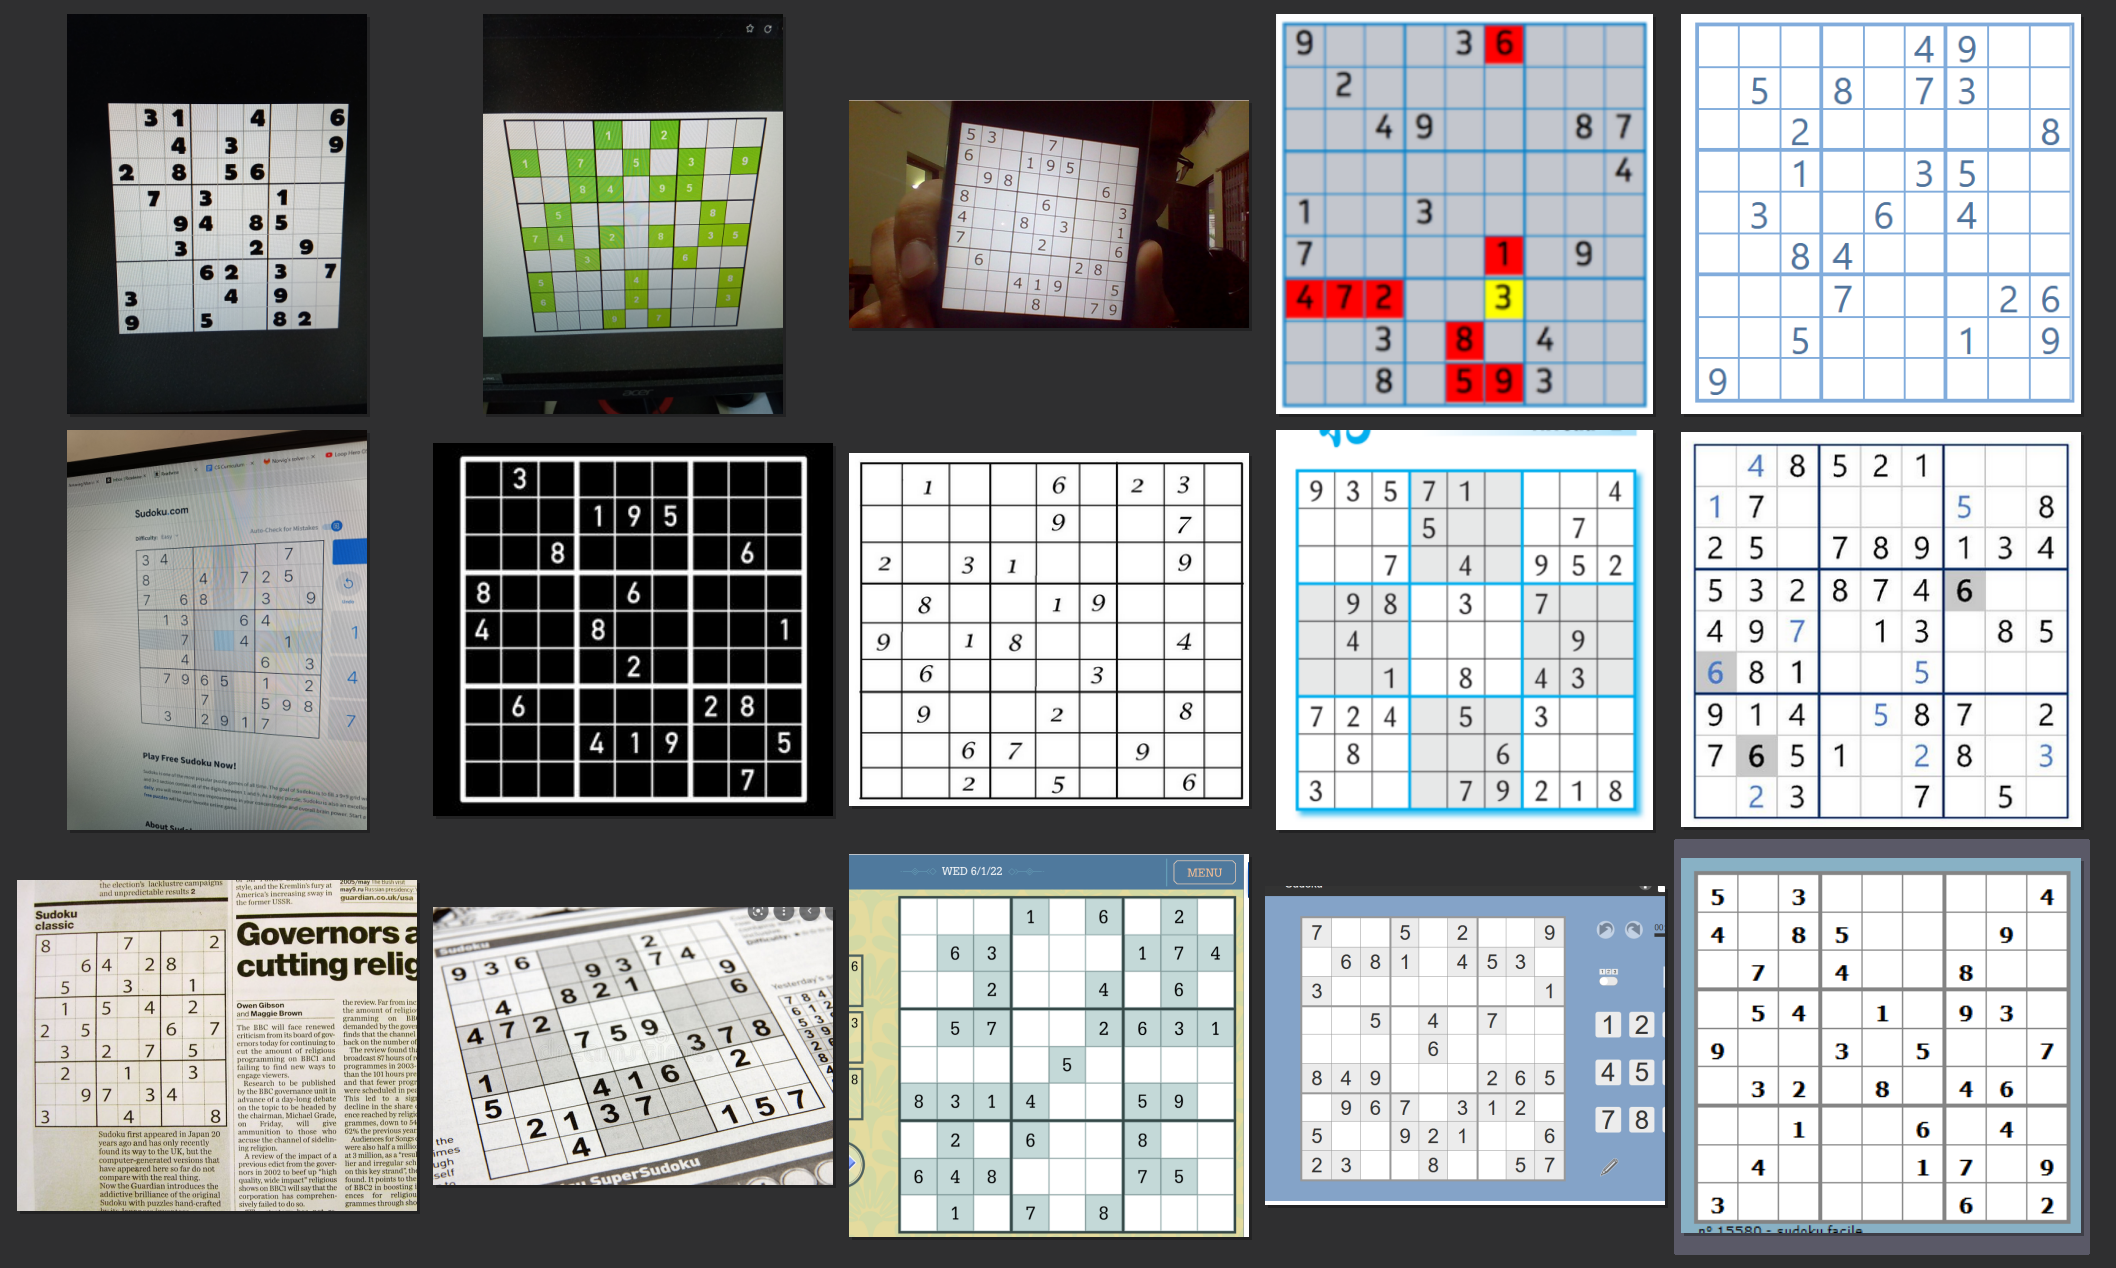
Concept inventory
This project was much more ambitious than my previous one. One might look at the goal line and feel like it’s just too hard.
No need to panic though, just break it down. What are the steps?
- Detect the grid in the screenshot/picture
- Find out where the cells are
- Read the digits
- Solve
Using OpenCV was immediately recommended to me by my friend Oswald who thought it was bound to have something useful.
Indeed, a quick search revealed that detecting Sudoku grids is a common example of the things you can do with some of OpenCV’s functions.
To my relief, another search revealed that Python has an implementation of Tesseract, an optical character recognition (OCR) program. No need to train my own neural network, which made the whole project seem a lot more doable.
There was also a handful of blog posts about people doing similar projects, which was encouraging. I knew I could always go and look at those if I was having problems.
First draft
Grid detection
I started with what I’m told is the usual first step in the programming workflow: search for what you want to do and see how people have done it.
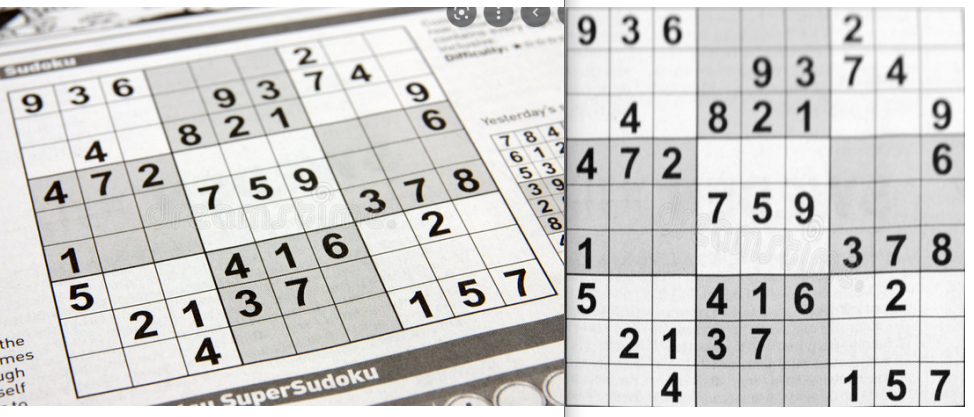
I found this post on StackOverflow quite convincing. The grid is detected, reframed and straightened into a square grid.
Thus, you ensure every picture is normalized to the same format. This is important, because it makes subsequent analysis much easier.
To do this, you first convert the image to binary (black and white, though here it’s a particular case of using adaptive thresholding).
Notice how the outer grid is the largest continuous structure. The helpful ‘findContours’ function retrieves the corners of said structure. With the corner coordinates, you can do a perspective transformation and “straighten” an image that was skewed.
This isn’t perfect, but the results can be surprisingly good.
Having never done that kind of image manipulation before, I was quite impressed with OpenCV. It really feels like there’s a pre-built function for everything.
I was also very thankful for the internet. Seeing at a glance the things that could be achieved fuelled me with energy and motivation to keep going.
Cell detection
Now that we have a straight grid with a standardized size, it’s time to detect the cells! I briefly considered just hard-coding cell coordinates, because I would always be working on 400x400 images at this point.
I quickly scraped the idea because it didn’t seem robust enough (this was correct) and I actually wanted to learn while doing this.
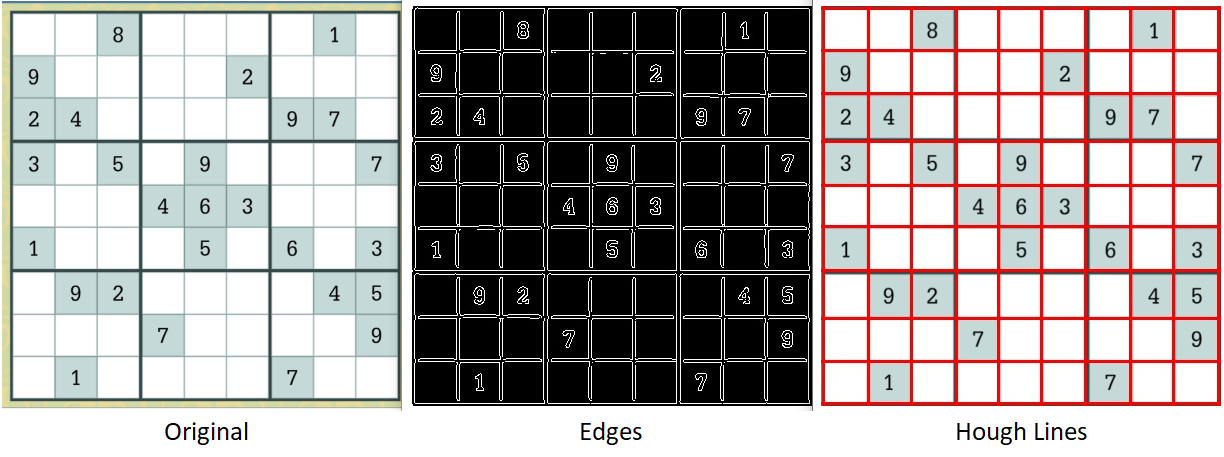
The tool used here is called Hough Transform. It’s a method for detecting any shape in an image by analysing the edges. I found this lecture by Shree Nayar excellent for understanding how it worked. (You don’t actually need to understand it, it’s just really interesting)
As for coding it, I found another helpful post on StackOverflow.
After thresholding the image, you use the Canny edge detector to… well, detect the edges (another video by Shree Nayar). The edges allow you to find the lines in a picture using Hough Lines, a particular case of Hough Transform.
It’s pretty clean on a screenshot and finding the lines is easy then. It gets more complicated with a picture, but we’ll get there later.
Reading the digits
Thanks to Hough Lines we have the coordinates for each horizontal and vertical lines, so we know roughly where the individual cells are.
We can then divide the grid in 81 cells, each of which we feed to Tesseract for digit recognition. I had to set Tesseract to single character mode and whitelist only the digits for it to work, but it did work for a clean grid from a screenshot.
Getting a first successful grid parse was tricky. I got errors such as Tesseract finding a digit in an empty cell, or giving the wrong result.
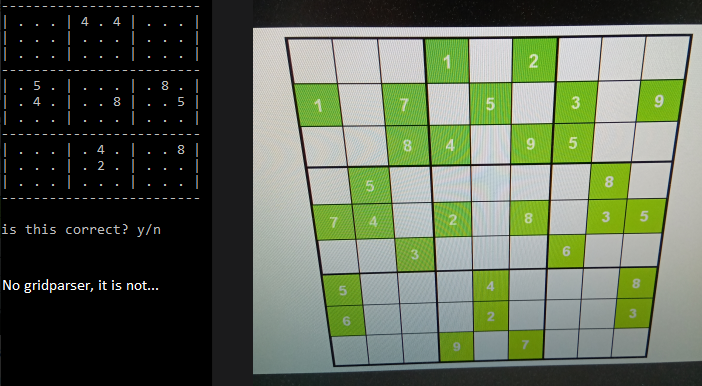
Most of those errors where due to a bit of grid appearing in the image fed to Tesseract (above, notice how the red lines aren’t perfectly aligned with the original grid). So I cut each cell a bit smaller than it was to avoid their edges, and I managed to get a friendly grid parsed correctly. I could just plug the digits into my solver and that was the prototype done!
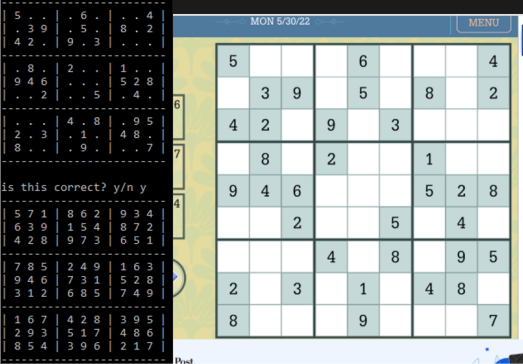
That prototype took about a day and a half. I was still far from done though. First of all, parsing a grid took over 8 seconds. But most importantly, my friends had sent me pictures, and my program did not like them.
Improvements
Function
Cell detection
One of the first issues I encountered while trying to deal with the picture was with Hough Lines.
One of the parameters you set is the threshold for the minimum number of points belonging to a line (that’s probably not exactly it, but it’s close enough). Too high and you miss lines, too low, and you get extra ones. Of course the sweetspot won’t be the same everywhere.
My solution was to start with a very high threshold and lower it until Hough Lines gave me 10 horizontal and 10 vertical lines.
Another important part of cell detection is to filter the lines given by Hough, especially on pictures that have Moiré patterns. If you don’t:
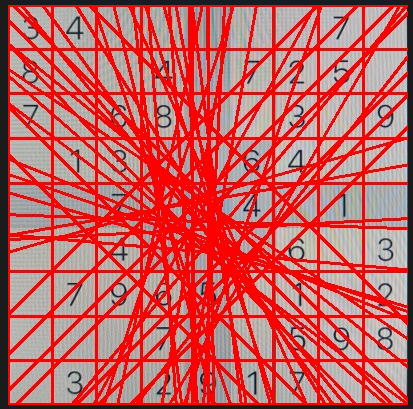
So you need to remove the lines that are neither horizontal nor vertical, as well as lines that are too close to each other.
OCR
Tesseract’s initial accuracy was lacklustre, even after using their “best” neural network instead of their “fast” one.
Their documentation was helpful, indicating that better image processing would yield the most improvement.
I made two main breakthroughs here. The first was to detect where a digit is in its cell using findContour, cut that part of the cell, and paste it on an empty canvas with the same background colour.
With this method, no more cell edges messing with Tesseract!
But there’s a problem with this particular picture, leading to the second main improvement. The humans among you probably see a 3, but you can’t fool the robots: this is an 8 (p = 0.72 !).
Notice the unfortunate Moiré line that accurately lines up with the open part of the 3. OpenCV has denoising algorithms to remove such effects, but they were slow and didn’t seem to improve much.
Denoising aims to retain image fidelity, which isn’t really the point here. So I used colour quantization, the process of reducing the numbers of colours in a picture. Now Tesseract agrees with humans (AGI, here we come!).
Speed
The first successful screenshots took 8 seconds to parse. Unacceptable!
Investigating pointed me to the OCR. Each use cost .1 second, and there are 81 cells in a grid. Mind you, that was with the “fast” neural network. The “best” one was even worse.
The first plan was to find a way to detect cells that have a number in them, so that I don’t have to use Tesseract on them. I went through several ideas and eventually settled on using colour quantization on a small square at the center of the cell. If this operation netted 2 colours, then there must be a digit in there and it’s worth feeding it to Tesseract.
That’s all well and good, but we’re still looking at parsing times over 3 seconds…
I was using PyTesseract, having looked for a Python implementation of Tesseract. This was actually a bad choice, as I later read:
Tesserocr is a python wrapper around the Tesseract C++ API. Whereas pytesseract is a wrapper for the tesseract-ocr CLI.
A picture is worth a thousand words, as they say. I’ll let you guess which is which (time in seconds).
From what I understand, PyTesseract closes after each use, so it has to load the 15MB neural network every time. With Tesserocr you can keep the API open until you’re done reading.
While screenshots were going pretty fast, I had issues with some pictures taking close to 1.5 seconds. As mentioned before, these had a lot more Hough Lines to filter through. Improving the filtering algorithm and image processing so that there’s less unsuccessful OCR attempts got my worst case down to .8 seconds, with the best case under .2 seconds.
Finishing touches
I couldn’t resist making a few “quality of life” improvements.
I added the ability to grab an image from the clipboard, from drag and drop or from the file path in clipboard. I packaged it into a portable .exe that can be used anywhere (as long as you have the trained data file in a folder next to it). Coolest of all in my opinion was to show the original transformed grid with the digits on it.
I also hosted it as a webapp. Pythonanywhere is free and easy enough to work with, but their servers are slow and sadly this doesn’t make for a good user experience.
I used Django to make the app. While the tool seems good or even very good, this first dip into web-dev wasn’t a great experience. I initially tried to follow their tutorial and was baffled by the near exclusive use of Object-Oriented Programming (at least that’s what I think it was).
I wanted to do simple things, and this didn’t feel like it. I ended up using my search engine instead.
Being totally ignorant in html and web languages in general most likely didn’t help either, but I made it work in the end. I guess I had it coming, approaching the task with zero prior knowledge in the field. I’ll blame it on me rather than web-dev for now.
Conclusion
I think this project was a good showcase of what Python is good for: patching together efficient libraries in a way that’s approachable to rookies.
With that said, this particular process wasn’t my favourite part of the experience. Dealing with those black boxes often felt like I was gambling with the parameters until I eventually found some that produced good results, especially for the OCR. I’m told this is often the case with AI, but I suspect this is true in general when you use tools you don’t understand.
My favourite parts in this project were :
- Targeted problem solving. e.g. recognizing that getting rid of a Moiré pattern wasn’t about image fidelity here, and using colour quantization for it. I specifically remember whooping and clapping my hands when I implemented it and it worked.
- Most importantly, cleaning and optimizing (or rather, non-pessimizing) my code at the end. This is the part where I went in, looked up a moment later and hours had passed and I’d forgotten to eat.
Taking all these into consideration, I think it’s logical that I try and learn C/C++ next.
From what I understand, this should satisfy both my taste for optimization and for going in-depth.